Before we created the document we added a standard 3mm bleed.
This created a singular page, the centre of the document is not marked meaning that the centre would have to be located manually. So we set up a new document using the correct technique.
We set up the new document in a similar way, but created two singular pages instead of one single spread.
However, this creates a document where the pages are seperated, to overcome this add another page to the document. The extra page will not be printed when it comes to printing.
Next we looked at the printing options for our document.
We changed the paper size so it was correct, and made sure that the page was printing landscape.
Moreover, we also checked that the bleed will be printed, and added crop marks to help us when trimming the outcome.
Finally, we added the page range to ensure that the whole spread printed.
If we go to the menu, located at the top of the 'Pages' pannel and select 'Allow document pages to shuffle' then we can then move the pages so that they appear as a double page spread.
Moreover, we can use the same technique to create a multiple page spread.
We also looked at guides that are created by dragging down from the rulers, this can be done to a single or double page.
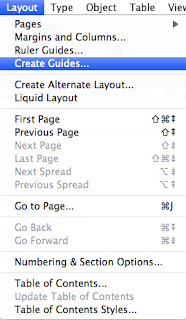
However, there is a an easier way to do this by creating guides. By going to layout - Create guides, we can create guides and grids
We next looked at importing images into InDesign, it is important to use the correct sized image and avoid using JPEG. images.
We need to open the internet JPEG. image in photoshop, resize it, and save it as a TIFF. file.
Un-tick resize image and change the resolution so that it is suitable for printed media.
Once the image has been saved into your InDesign folder, go to file - place to import the image.
We can also resize the image in InDesign, but doing this can lower the quality of this image.
To check the scale of the enlargement look at the tools bar at the top of the document, this is useful if you want to adjust the image by a specific percentage.
Moreover, when in photoshop rescaling the image, certain quality can be lost. To overcome this there are options within the 'Image Size' menu.
Moreover, we can look at more information regarding the image by selecting the image and clicking 'Link'.
We next looked at how frames can be manipulated to hold text and images in different ways.
Create outlines so that the text doesn't need the font information
Moreover, we can fit an image or text that has been converted into multiple boxes. First, create the boxes and go to Object - Paths - Make Compound Path.
Then select the boxes, go to File - Place and the image or text will appear within the arrangement.
This can also be done with text.


No comments:
Post a Comment